Map Over Pro - Help
Overview
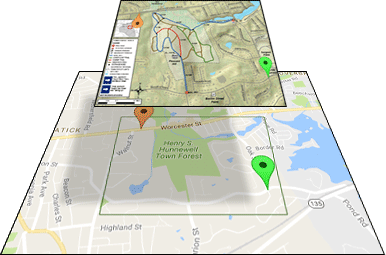
Navigate with your maps and images overlaid over maps from Google. Track your current location. Use waypoints to mark locations and calculate distances.
Your overlaid image is "pinned" to the map with two "pin points".
Uses for Map Over Pro includes hiking, biking, geocaching, cross-country skiing, trail running, golfing, exploring on foot, visiting public parks and zoos, property management, real estate, geology, land surveys, off-roading, and more.
Topics
| Features | Creating Overlays | Overlay Tips |
| Managing Overlays | Waypoint Lists | Waypoints |
| Target Waypoint | Compass | Map |
| Map Waypoints | Settings | General Tips |
| Geocaching | File Formats | Safety and Disclaimers |
Features
- Overlay PDFs or images over live maps from Google.
- Use GPS to display your current location.
- Displays distances between your location and waypoints.
- Navigate to waypoints with the Compass.
- Adjust transparency of overlays.
- Load images from phone memory, SD card, camera, & cloud.
- Supports Google Drive, Microsoft OneDrive, and more.
- Imports PDF and most image formats.
- Create waypoints on the fly.
- Import waypoints from GPX lists (i.e. Pocket Queries).
- View map in Road, Satellite, Terrain or other modes.
- Share overlays and waypoints via email, Google Drive, and more.
- Backup and restore functions.
- Built-in help.
Creating Overlays
Select Create from the menu. Map Over Pro will guide you step-by-step.
- Select an overlay image. If you select a PDF file, choose which page to convert .
- Pick first image point. Use the crosshairs to select the first alignment point (Image Point A) on the image. (See tips below.)
- Find matching map point. Use the crosshairs to select Map Point A that corresponds with Image Point A. Hint: use the Search feature to position the map.
- Pick second image point. Select a second point (Image Point B) for alignment.
- Find matching map point. Select Map Point B that corresponds with Image Point B.
- Name the overlay. Give the overlay a name and save.
You will be in Edit Overlay when done. Preview your overlay. Adjust points if required.
Map Over Pro doesn't include overlays, however, it's easy to create your own. You can also share overlays with other Map Over Pro users.
Overlay Tips
- Use high quality, accurate map images. Poorly drawn or incorrectly scaled images will not align or overlay well.
- Zoom in when selecting points for better accuracy. Hint: double-click the screen to zoom all of the way in and out when selecting image points.
- Use the map Search feature to locate points on the map.
- Increase the separation (distance) between point A and B for better results. For example, pick point A near the upper left corner and point B near the lower right corner.
- Use well defined landmarks (i.e. street intersections) when possible.
- Use the Preview option to display just the current overlay without waypoints for a quick check.
- Move the transparency slider to check alignment between the image and the map.
- Try different points if alignment seems off.
- Images can be imported from Google Drive, Images, Gallery, Downloads, Internal or External Storage, or File Manager.
- Supported image formats include GIF, JPG, BMP, WEBP and PNG.
- Images can be captured with the camera and then imported from the Gallery.
- Only one page of a PDF file can be converted at a time.
- If imported images appear pixelated try increasing the Import and Display Image Sizes.
- Higher quality images (4 MP or more) provide better results, however they use more memory.
- Keep Import and Overlay Image Size matched.
- Try to keep imported image resolution close to the to the Import Image Size.
- The name of a new overlay defaults to the image name. When possible, save the image or PDF with the overlay name you want and thereby save yourself a step when creating the overlay.
- Very high-resolution images(non-PDF) may become blocky when imported and scaled into Map Over Pro. Scale images prior to import for best results.
Managing Overlays
Select Overlays from the menu to view Overlay list.
- Click an overlay name to edit.
- Long-click an overlay name for more options (Edit, Delete, Share, Show on Map).
- Overlay visibility can be enabled or disabled with the checkbox.
- Click the floating "+" button to create a new overlay or import an existing KMZ file.
Use Edit Overlay to change name, image, visibility or pin points.
- Touch image or map pin points to view or update position.
- Click Preview to view the overlay. (Other overlays and waypoints aren't displayed.)
- Click Map to view overlay in map view.
- Click Show Details to get more information.
- Use Share to share the overlay as a KMZ file.
- Overlay can be enabled or disabled with the visibility toggle.
- Loading too many overlays at once in the Map will use up memory and may cause the app to crash. Turn off overlays you don't need to conserve memory.
Waypoint Lists
Select Waypoints from the menu to view Waypoint Lists.
- Waypoints are markers that are used to indicate locations (trail heads, parking area, geocaches, etc.).
- Waypoints are grouped into Waypoint Lists. A list is a file which can contain one or more waypoints.
- Click waypoint list name to edit. Long-click for more options (Edit, Delete, and Share).
- Use the option menu for more options (Sort by Name/Description, Go to Target, Clear Target, Share).
- Click the floating "+" button to import an existing GPX file. Map Over Pro can import Pocket Queries from Geocaching.com.
- Use the checkbox to enable or disable lists on the Map. Hide unneeded lists to improve performance and reduce clutter.
- "My Waypoints" is a special list for your custom waypoints.
- Imported waypoints are displayed red on the map, custom waypoints are blue, and the target waypoint is purple.
Waypoints
Click a waypoint on the list to set it as the Target Waypoint. Long-click for more options:
- Set as Target. Sets current waypoint as the target waypoint.
- View on Map. Displays waypoint in map view.
- Edit. Provides dialog box to edit waypoint name, coordinates, etc.
- Delete. Removes the waypoint from the waypoint list.
- Send to Geocaching App. Opens geocaching app or web browser with URL "https://coord.info/<Waypoint Name>". Name field of waypoint should contain a valid geocache "GC" code.
- Send to Mapping App. Sends coordinates to default mapping app (aka Google Maps in map mode).
- Send to Navigation App. Sends coordinates to default navigation app (aka Google Maps in navigation mode).
Waypoints are displayed in the map view. Custom waypoints can also be created in the map view. See the map view help topic for more information.
Target Waypoint
One waypoint can be selected as the target waypoint. The target waypoint has the following features:
- Compass target indicator (green arrow) will point at the target.
- Compass will display distance to the target.
- Waypoint marker on map is colored purple.
- The info window of any waypoint will display the straight line distance to the target.
Compass
Select Compass from the menu to view the compass. The compass:
- Displays the current heading and location in latitude and longitude.
- Uses the current location to determine the declination (deviation from true North).
- True North is displayed as a small white arrow.
If a target waypoint is selected the compass also:
- Displays a green pointer arrow to indicate direction to target.
- Displays the bearing and straight line distance to the target.
- Displays the name and description of the target waypoint.
Magnetic and accelerometer sensors are required for the compass to function. The compass sensors may sometimes require calibration. Move the device in a figure-eight path as described here.
Map
Select Map from the menu to view the live map, overlays and waypoints. The map controls are similar to Google Maps.
- Overlays are displayed over maps from Google.
- The transparency of the overlay is controlled with the slider bar at the bottom of the screen.
- Map view is panned by dragging with one finger.
- Zoom level is control by pinching with two fingers or with the +/- buttons.
- Rotation is controlled with two fingers.
- Perspective can be changed by dragging up/down with two fingers.
- Road, Satellite, Terrain, and Hybrid map type can be selected from the option menu.
- Use the Choose Style option to set Normal, Retro, Night, Grayscale or 'No POIs or transit' styles. Styles are only visible with Road map type.
- Additional options include Go to Target and Clear Target.
- Click the target icon to center map on current location.
- Double click the compass icon to realign North to top.
Map Waypoints
Waypoint markers are displayed on the map.
- Waypoints are color coded: Red - standard, Blue - custom (My Waypoints), Purple - target.
- Long-click the map (touch and hold) to create a new waypoint at that point.
- Clicking a waypoint will bring up the info window.
- The Info window displays the waypoint name, description, distance to target, and distance from current location. Distances are calculated along a straight line.
- Click the info window to set the waypoint as the target waypoint.
- Long-click the info window for more options (Set as target, Edit, Delete, Send to Geocaching Website, Send to Mapping App, Send to Navigation App).
Settings
The settings option is available from the navigation drawer side menu.
- Disable Screen Timeout. Keeps the screen from timing out while in the Map or Compass view.
- Distance Units. Select between Imperial units (feet, miles) and Metric (meters, kilometers).
- Backup and Restore. Note that overlays and waypoints can also be exported with the
"Share" option.
- Backup. Saves all user files (overlays and waypoints) into a single file named MapOverBackup.dat to the Download folder. Use this option for backups or when transferring Map Over Pro to a new device.
- Restore. Restores all user's files (overlays and waypoints) from the backup file MapOverBackup.dat in the Download folder. This option won't remove existing information but will overwrite any overlays or waypoint lists with the same name.
- Bulk Export. Exports all overlay and waypoint list files as individual files to the Download folder.
- Import Image Size. Specifies the maximum resolution for storing imported PDFs and images. Larger images will be scaled down. Higher settings improve quality images but use more device storage.
- Overlay Image Size. Specifies the maximum resolution used when displaying images on the map. Use larger sizes for better quality. Use smaller sizes to reduce out-of-memory issues. The Overlay Image Size should match the Import Image Size for best results. 4 MP provides reasonable quality and performance.
General Tips
- Use caution and common sense when navigating with Map Over Pro. Misalignments can make the current location appear incorrect. Pay special attention at trail junctions.
- An Internet connection is required to create an overlay but it is not required to use it.
- Map Over Pro works better with Internet access. The map view and compass view will work without it but some functionality will be reduced.
- Try to match imported images (non-PDFs) resolution to the Import Image Size (typically 4 MP).
- Loading too many overlays may cause your device to run out of RAM memory ("Application has stopped responding" errors). If this occurs, disable any overlays or waypoint lists that aren't required. If the issue persists, try reducing the Overlay Image Size setting.
- Battery tips: Low signal strength may result in shorter battery life. Turn off bluetooth and wifi when not needed.
- Files recently saved to Google Drive may not appear in Map Over Pro. View new files in the Google Drive app to to force-sync new files.
- Map Over Pro includes sample waypoint and overlay files to help you get started. Feel free to delete these when you no longer need them.
- Map Over Pro overlays can be exported as KMZ files and loaded in Google Earth. Check out your overlays in 3D!
- Use the Navigation Drawer (sliding menu) to quickly jump to other parts of the app. Click the menu icon in the upper left corner, or drag right from the left edge of any screen to open. Drag left to close.
- Click the Map Over Pro icon at the top of the navigation drawer to return to the main menu.
- Some lists offer more options to a long touch: Overlays, Waypoints Lists, Waypoint. Also, the info windows for map markers support additional options.
- Be respectful and don't use or share copyrighted media.
Geocaching
Map Over Pro is great for geocaching.
- Overlay local trail maps to help navigating trails to the caches and minimize bushwhacking.
- Switch between road, satellite and terrain views for help with navigating.
- Import Pocket Queries from Geocaching.com as waypoint lists.
- Link waypoints to Geocaching.com:
- Enter the GC Code as the waypoint name.
- Tap cache waypoint to view title.
- Tap and hold the title to display the extended menu.
- Tap "Send to Geocaching App".
- Get directions to parking areas:
- Tap parking waypoint to view title.
- Tap and hold the title to display the extended menu.
- Tap "Send to Navigation App" to get directions to waypoint via your navigation app (i.e. Google Maps)
- Drop custom waypoints for marking multi-cache stage and final coordinates.
- Tap a waypoint and set it as the target. Then, navigate to it with the Compass.
- Use the Map or Compass to view the distance to waypoints.
- Drop a custom waypoint where you park.
File Formats
- Map Over Pro stores overlays in Keyhole Markup Language (KML). Map Over Pro compresses KML files to KMZ files. KMZ files can be exported and used in other mapping applications such as Google Earth.
- Map Over Pro stores waypoints lists in GPS Exchange (GPX) format. GPX files can be used for importing geocaches from websites such as geocaching.com.
- Keep names short and simple if you plan on exporting files for use in other applications.
- Click Share to export files to Email, Bluetooth, Save to Drive, and more.
- Click '+' to import KMZ and GPX files.
Safety and Disclaimers
Hiking, backpacking, geocaching and other outdoor activities involve risk to both persons and property. There are many variables such as weather, fitness level, terrain features and outdoor experience, that must be considered. Be prepared and be sure to check the current weather and conditions before heading outdoors. Always exercise common sense and caution.
Map Over Pro users assume all risks involved while using Map Over Pro. Map Over Pro is owned and developed by Core Software Design. Core Software Design does not warrant the accuracy, reliability, or timeliness of any information and shall not be liable for any losses caused by such reliance on the accuracy, reliability, or timeliness of such information.
In no way shall Core Software Design nor any agent, officer, employee of Core Software Design, be liable for any direct, indirect, punitive, or consequential damages arising out of, or in any way connected with the use of this application or use of the information contained within. This application is for personal and non-commercial use. See the EULA topic in Settings for more details.