Amsler Grid Pro - Help
Overview
Amsler Grid Pro is a medical app that simulates the effects of macular pucker, a common eye condition that can cause distorted vision. The app can be used to assess and monitor your vision, and to track changes over time.
What makes Amsler Grid Pro different from other apps is its ability to realistically simulate distortions on live video, photos and screenshots in addition to grids.
Features:
- Simulate realistic distortions created by macular puckers.
- Provides multiple versions of the Amsler Grid.
- Apply optical effects to live video and screenshots.
- Enhance communication with healthcare providers, family, and friends.
- Record results. Track vision changes over time. (*Requires Premium Package)
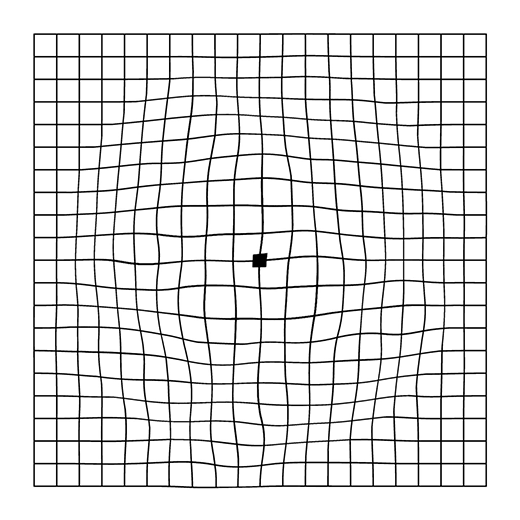
The Amsler Grid has been a primary assessment tool for patients since 1945. Amsler Grid Pro updates this approach with mobile technology to provide patients and providers the power to explore vision impairment and document changes.
Macular pucker is also known as epiretinal membrane, macular wrinkle, cellophane maculopathy, epimacular membrane, metamorphopsia and preretinal membrane.
Topics
| Features | Vision Testing |
| Tips | Backgrounds |
| Visual Effects | Assessment |
| Live Video | Shapes |
| Sessions | Export and Sharing |
| Provider Package | Disclaimer |
Features
Standard Package:
- Provides standard Amsler Grid and variations for vision test.
- Simulates distortion, scaling, pinch/pull, and other effects.
- View distortion effects on live video and screenshots.
- Supports back and front video cameras.
- Simple black and white theme for vision-impaired users.
- Built-in help file.
Premium Package (In-App Purchase):
- Track membrane changes over time.
- Monitor membrane changes and post-surgery recovery.
- Save unlimited number of sessions. Edit, update, and delete sessions.
- List sessions by name or date. Share sessions in Comma Separated Value (CSV) format.
Provider Package (In-App Purchase)
- Display provider contact information on app screens.
- Include provider contact information in shared documents.
Vision Testing
The goal is to create an accurate representation of the distortion by adjusting slider controls. The app provides several realistic distortion Shapes to choose from.
- If you wear reading glasses, put them on.
- Select New to clear any existing settings.
- Hold the phone or tablet at your standard reading distance (20-28 inches).
- Focus on the center spot of the grid your affected eye. Try not to let your eye wander.
- Make a mental note of the distortion properties.
- Adjust the Amount and Darkness sliders.
- Review the provided Shape and select one that best matches your vision.
- Adjust the Size and Position of the shape if necessary.
- Add general effects such as Enlargement, or Pinch/Pull.
- Change the grid and background with the Previous and Next buttons.
- Turn on the camera to simulate distortions on live video.
Tips
- Touch the grid to move the shape. Use two fingers to resize it.
- Quickly toggle all effects on and off with the Effects Switch.
- Estimate how much the grid lines deviate in terms of grid cells. For example, is it half a cell or more than a full cell?
- Estimate the wavelength. How many times does a grid line deviate up or down? Once? Twice? Ten times?
- Consider the size of the effects. Do they cover most of your vision or just a small area?
- Use live video to compare distortion in common environments. This is helpful as you can view familiar objects such as rooms and surroundings.
- Use the front camera for selfie mode to view your own face.
- Tap the screen in video mode to capture an image. Tap again to restart the video.
- Select 'New' in the menu to reset all sliders.
- Long-press (touch and hold) the effect label to turn off the effect and reset the slider to its original position.
- For better results, use a tablet or phone with a large screen.
Vision assessment assumes you have one eye without serious vision impairments.
Backgrounds
Amsler Grid Pro provides multiple backgrounds. Backgrounds are changed by the Previous (<) and Next (>) buttons. If available, the captured image will be included at the end of the list.
- Standard black-on-white Amsler Grid
- Amsler Grid white-on-black
- Amsler Grid red-on-black
- Amsler Grid low contrast
- Solid white, for assessing dark areas
- City skyline. View how buildings are curved and affected.
- Portrait painting (Mona Lisa). View how faces are distorted.
Visual Effects
Move the sliders to increase and decrease effects. A long click on any slider label will reset the slider to its initial value and turn off that effect. The New command resets all effects and the session name. The membrane shape can be moved by dragging with one finger or scaled with two fingers.
Distortion
Amount. Sets the amount of distortion from the membrane.
Darken. Membranes may darken areas where they are thicker. Set this effect to match any darkening effects you perceive.
Shape. Set the membrane shape. Shapes include circular, smooth circular, small circular, full vision, full vision smooth, wide, and tall.
Size and Position
Size. Increase and decrease the size of the membrane. You can also use two-finger gestures to scale the membrane.
Horizontal, Vertical. Positions the membrane on the field of view. You can also use one finger to drag and position the membrane.
General Effects
Enlarge. Some membranes create a general enlargement or magnification effect.
Pinch/Pull. Puckers can have an overall squeezing or enlargement. This creates a spherical pinching or pulling "barrel" distortion.
Pinch Size. Controls the radius of the Pinch/Pull effect.
Assessment
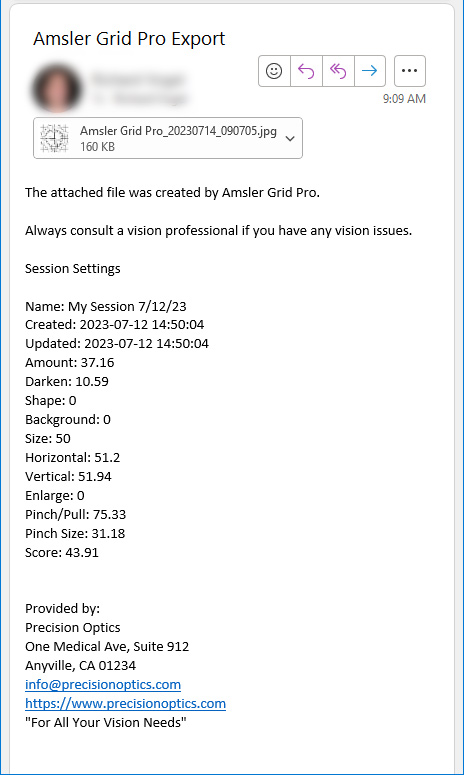
Score. Average score of Distortion and Pinch/Pull effects. Assessment scores provide a quantitative basis to compare sessions based on the amount of applied effects. Vision assessment assumes you have one eye without serious vision impairments.
(The following fields are available with the Premium Package)
Name. The name of the session is set when you save it. You can edit the name from the Sessions screen. An asterisk (*) will be appended to the name if a loaded session has unsaved changes.
Created. Date and time the session was first saved.
Updated. Date and time the session was most recently saved.
Live Video
You can apply the distortion effects to both live video as well as static test grids. To capture an image in the preview video, simply tap it once. Tapping the preview video again will restart the video mode. Please note that captured images will be saved along with the session (Premium Package required).
Video Enable. Use this control to toggle the video camera on and off.
Change Camera. Use this control to toggle between the front and back cameras (hardware dependent).
Camera Rotation. Go to Settings / Camera and select an optional rotation setting to fix incorrectly rotated images if necessary.
Shapes
Select a shape that best matches your vision. You can change the size and location with sliders or touch.
- Standard. This shape is circular and can be used in most circumstances.
- Smooth. Similar to Standard but with smoother distortions.
- Small. Useful for small membranes.
- Full. Covers most of vision.
- Full Smooth. Smoother version of Full.
- Tall. A membrane that is taller than it is wide.
- Wide. A membrane that is wider than it is tall.
Sessions
The settings of all simulator sliders and controls are automatically saved. In the standard version, only the current session is saved.
- Select New from the menu to reset all sliders and create a new session.
- Select Share to send a copy of the session's settings and image to an external service (i.e. email).
Premium Package (In-App Purchase)
The Premium Package offers additional features for saving and managing multiple sessions. Sessions can be named, and the date and time of creation and last update are tracked.
Key features include:
- Keeping track of measurements over time
- Measuring before and after surgery
- Monitoring multiple users
- Sharing images and session results
- Saving an unlimited number of screenshots
From the Simulator Menu:
- Sessions can be saved by selecting 'Save' from the menu. You will be prompted to name the session. If the session already exists, it will be overwritten and updated. Otherwise, a new session will be created.
- Save a new copy of a session by selecting 'Save A Copy' from the menu. You will be prompted to name the session, and a new session will always be created.
- Saved sessions can be managed by selecting 'Sessions' from the menu, which will take you to the sessions page.
From the Session Screen:
- Touch a session to load it.
- Long-press a session to display a dialog menu with options to load, edit, or delete the session.
- Select 'Share' to export all sessions.
- Use the menu to sort the session list by creation date, update date, or session name. Selecting the same item will reverse the sort order.
Export and Sharing (Required Premium Package)
Please note that available sharing options depend on your device and the installed apps.
- From the main view, select 'Share' to share the current settings and image with other apps (email, messaging, etc.). The current image and session settings will be exported.
- Choose 'Save to Gallery' to export the current image to the Pictures folder in the Gallery app.
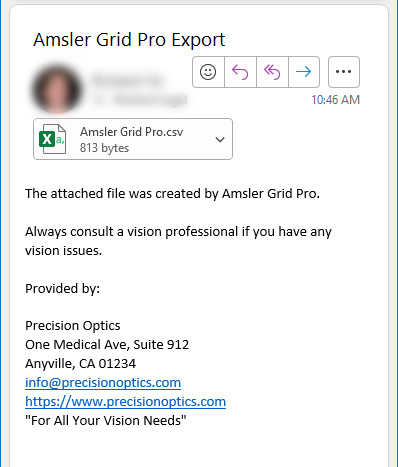
- From the Sessions view, select 'Share' to export a comma-separated value (CSV) file (via email, Google Drive, etc.). CSV files can be imported into Excel or other software for analysis, backup, and archiving purposes.
Amsler Grid Pro session and screenshot data is backed up to the cloud by the Google Auto Backup service. Use a USB cable to move the app to a new device if you have more than 500 screenshots.
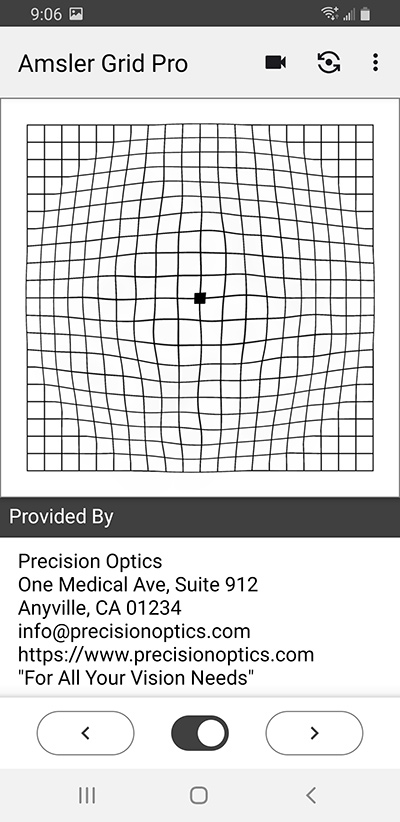
Provider Package
The Provider Package is designed for optometrists, ophthalmologists, and other vision professionals. Typically, Amsler Grid Pro is installed on an office tablet and provided to the patient under the guidance of staff. The app displays the provider's name and contact information during startup and on the main view. Contact information is also included in shared documents.
Provider Package Setup
- Purchase or upgrade to the Provider Package from the Upgrades page.
- Go to Settings and select 'Provider Contact Information.'
- Enter your name or the name of your practice, clinic, or business. You may also optionally add your office address, email address, website, and additional information.
Sample Screens and Exports
Disclaimers
Using Amsler Grid does not replace the need for regular ophthalmic examination.